springboot--helloworld

 时间:2026-02-15 03:54:40

1、在eclipse的package explore中右键-->new -->other --> maven --> maven project, 弹出一个面板,选中create a simple project后单机next, 

springboot--helloworld

2、填写group id 和 artifact id,packaging选择jar后点击finish,完成创建

springboot--helloworld

springboot--helloworld

1、打开pom.xml文件

springboot--helloworld

2、添加如下图中内容,使之成为一个spring boot 应用

因为搭建的是web应用,所以需要添加spring-boot-starter-web依赖

springboot--helloworld

3、最后,因为springboot2.0可能在中央仓库中不存在,需要添加如下

springboot--helloworld

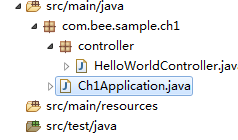
1、如图中所示,创建两个文件,分别是Ch1Application.java和HelloWorldController.java文件

springboot--helloworld

2、Ch1Application.java和HelloWorldController.java文件代码如下

springboot--helloworld

springboot--helloworld

3、run Ch1Application.java文件

springboot--helloworld

4、浏览器中输入url: http://127.0.0.1:8080/say.html,成功

springboot--helloworld

  • SpringBoot1-第一个HelloWorld
  • springboot项目(一)创建springboot+mybatis
  • Spring Boot系列之jdbc
  • 为什么需要springboot
  • spring学习(2)-spring项目的第一个helloworld
  • 热门搜索
    银川旅游景点大全 岱山旅游 旅顺旅游 奥地利旅游 巴中旅游 福州旅游景点 冲绳旅游 甘肃旅游地图 惠州商贸旅游高级职业技术学校 象山旅游攻略